Text by Ohara Sota (Photographer)
A third state of emergency has been declared, and the situation continues to be quite difficult. In the midst of this, the hobby of “Gunpla”, which can be done at home, is gaining renewed attention. I’m sure there are some of you out there who enjoy this hobby.
And when you have successfully assembled a model, you may want to show it to someone! This is why many of you may take pictures and upload them to SNS.
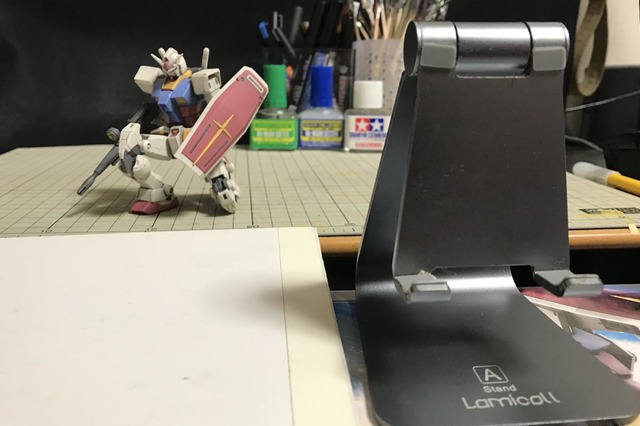
However, when you take a picture, does it look like this?
・A photo that doesn’t tell what you want to say because it’s taken from a distance (a photo with a lot of useless information)
・Putting the subject in the middle of the picture for now.
・Shadows of yourself or your phone are reflected in the photo.
・A photo in which the white of the Gundam is too bright and blown out
・Photographs that are unintentionally blurred by shaking
・Photographs that are unintentionally out of focus
That is what you can achieve you take a picture with a smartphone, just by being aware of five points.
This time, Anime! Anime! Sota Obara, a professional cameraman takes pictures for many web media including Anime! Anime! and loves Gunpla, will teach you 5 points on how to photograph Gunpla that you can put into practice right now.
These 5 points can be applied not only to shooting Gunpla, but also to shooting figures, people, food, and many other things. Please be aware of what I’m going to tell you, take great pictures of your favorite models, and share them on social media!
Why are your photos not good enough?
If you tend to think that your photos are not good-looking, do any of the following points apply to you?
・You are taking pictures without a clear idea of what you want to convey.
・You are not sure where to place the subject in the frame.
・You are just standing there and taking pictures.
・You are not thinking about light, such as the sun or lighting.
・You think it doesn’t make much difference where you shoot from.
What do you think? Are there any points that gave you a jolt?
I’m going to explain five points now, but the basic premise behind them all is that photography is best enjoyed.
When you want to take a picture, your mind must be reacting in some way. It would be a shame to miss your chance to take a photo by thinking about something difficult. When your heart is moved by something, press the shutter.
The five points I’m about to explain will help you improve just by being aware of them. Continuation is the key, and if you do it repeatedly, you will be able to do it naturally when you shoot. Just try it once and see what happens.
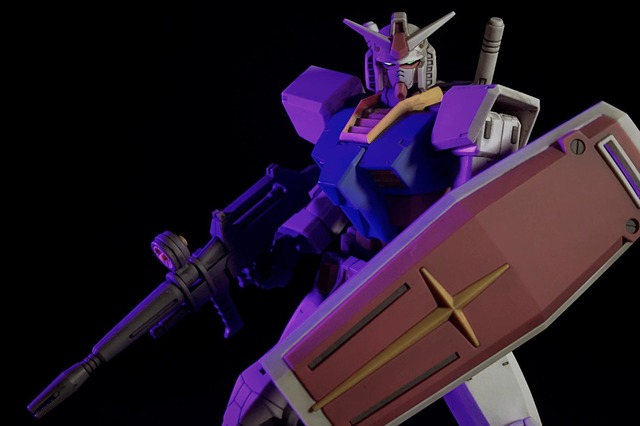
1. Put what you want to say into the photo!
When you want to take a picture, your mind must be moving in some way. What is it that moves you? What is it that you want to convey? Then take a picture.
For example, if you think “Gundam’s face is so cool!”, instead of taking a full-body shot, try focusing on the Gundam’s face so that the face appears larger. This alone will show that you want to show the Gundam’s face in this photo.
People’s eyes will go where the focus is. So focus on the part you want to convey. If you want people to see the details of the whole body, take the photo against a plain white or black background so that no extra information appears in the background.
If you can explain why you took the photo the way you did, and your intentions and goals, even blurry, high key/low key (bright/dark), or out of focus photos, which are often considered bad, are OK.
Just as the phrase “Gunpla is free!” means “Photography is free!” Put what you want to express in your photos!
2. From the top of the head to the bottom of the toes… concentrate on your posing!
Gunpla and action figures can’t move by themselves, so the photographer has to think about how to pose them.
But on the other hand, unlike portrait photography, no matter how long it takes or how difficult a pose you ask for, the photographer will do it without complaining. So, you can play around with the poses as much as you want until you get something you think is cool.
If it is difficult to make the figure stand on its own, you can use an action base.
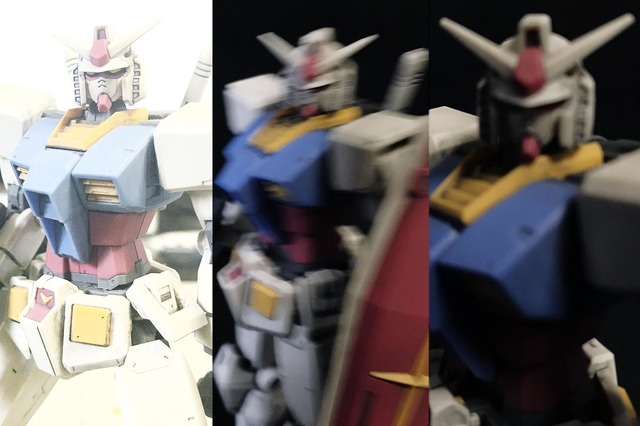
As an example of how the impression changes depending on the pose, look at the following pictures.
They both have the same standing posture, but which one looks cooler? The one on the left is hunched over and lacks strength, while the one on the right looks more powerful.
The impression of a person or a Gundam model changes greatly depending on how they stand. Make sure you create the right pose.
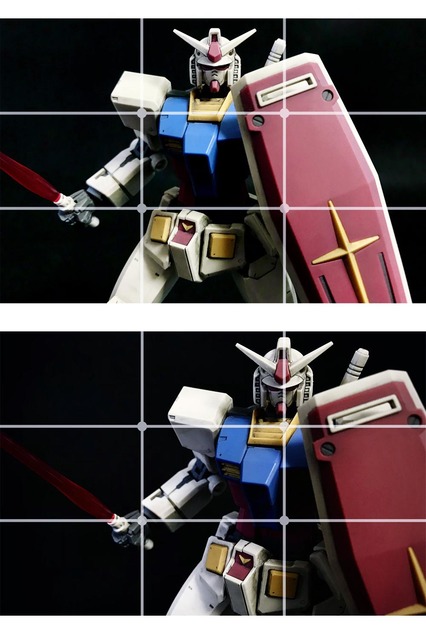
3. Use a grid and be aware of the trisecting method!
When you take a picture, there are times when you don’t know where to put something in the frame, right?
In such cases, try using the “Grid” function of the camera. You will see a line on the screen that divides the image horizontally and vertically into three parts.
The “three-part” method is to place the object you want to show at the intersection of the lines or on the lines. It’s a relatively versatile compositional method, so try it out and you’ll start to feel like your photo is coming together.
Below is a photo framed in the center (first photo) and a photo framed with the tripartite method in mind (second photo).
The first photo is not bad, but I think you can feel more movement in the second photo with the tripartite method in mind.
There are many other compositions, so if you’re interested, check them out. Once you get used to it, you’ll be able to use multiple compositions together.
Various video works have been created using composition (including the “Gundam” series, of course). So try to watch a lot of material about this and accumulate a stock of “cool compositions” in your mind.
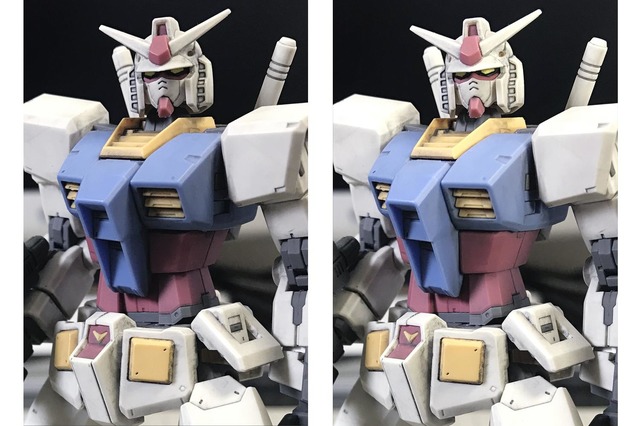
4. Read the way the light hits from the shadows!
The way the light hits your photo can make a big difference in how it looks. For example, if it’s a sunny day, a cloudy day, or if you shine a flashlight on your face from below, the way your face appears in the picture will be completely different.
This is not only because of the way the light hits you, but also because of the shadows. As the term “slope magic” suggests, the white of the snow acts as a reflector and softens the shadows, making you look more beautiful than usual. The way light hits an object and the way shadows appear affects the way it looks.
When you think about where the light is coming from, what you need to be aware of is how the shadows are coming out. By tracing where and how the shadows appear, you can find out from which direction the light is shining.
If the shadow is too strong with only the light in the room, put a piece of white paper or a white plastic plate near the subject. This will soften the shadows.
If it’s difficult to see the difference with a white reflector, you can use a mirror to get an idea of the reflection position first.
In the photo below, the left side shows only the light of the room, and the right side shows the light of the room reflected by the mirror to soften the shadow of the Gundam’s face.
If you feel that the reflection is too strong in the mirror, use a white reflector.
Gunpla are small, so you often have to get close to take pictures of them. Take pictures while being careful not to cast shadows on your subject, or to have your own shadow or the shadow of your phone reflected in the frame of the picture.
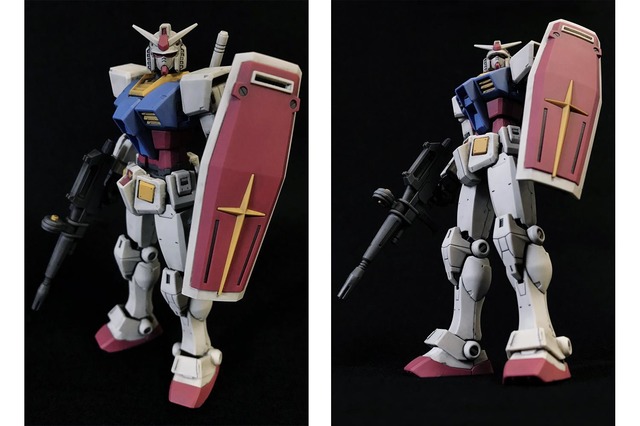
5. Shoot from the best angle!
Do you think that, “If I just change the position of the camera, it won’t make much difference in how it looks?”
Take a look at these two pictures. Do you know what the difference is between these two pictures?
Actually, it’s just that I took the photos with the top and bottom of the phone reversed. The size of a smartphone is at most a fist and a half. But it makes such a difference in the way you look.
Have you ever had the experience of taking a selfie at a good angle? The position and angle of the lens, in other words, the position of your point of view and the angle from which you look at it, can change the way you look.
With a digital camera, try taking pictures from various positions. Once you get used to it, you’ll be able to predict “if I shoot from here, I’ll get a cool shot.
Practice with the 5 points in mind
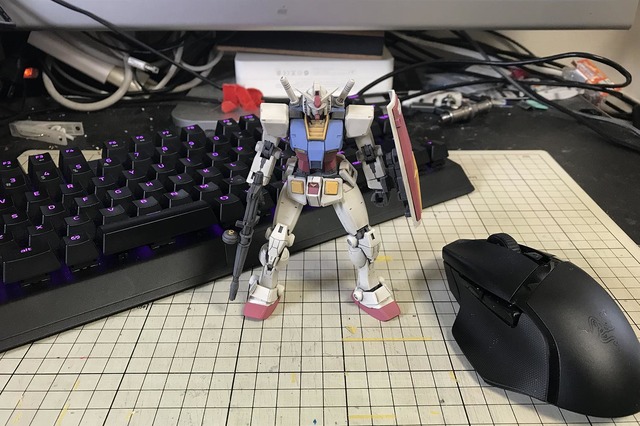
So, let’s actually shoot with the five points I mentioned in mind. I will be shooting with three conditions in mind, assuming the shooting environment of our readers.
1. Shooting with a smartphone
2. Shooting location is on a PC desk
3. No special lights or flash.
These are pretty tough conditions, but… I’ll push on! (Sanger Somvold style)
To review, the first thing to do is to decide what you want to convey in the photo.
What I want to convey in this photo
・The coolness of the Gunpla right after completion.
・The amazing range of motion of the “HG RX-78-2 GUNDAM BEYOND GLOBAL” (hereafter referred to as “Beyond Global”).
I would like to take photos that can convey these two points.
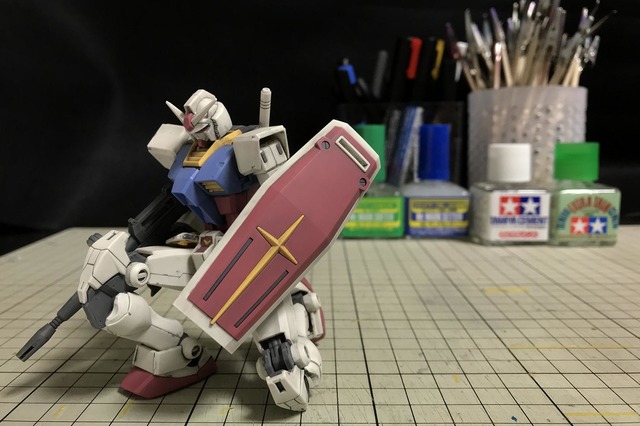
Since the shooting location was limited to a PC desk, I decided to use a background that would give the impression of a making a plastic model environment. For the pose, I chose to pose the model with its knees bent to show the amazing range of motion of the Beyond Global.
Let’s take a picture.
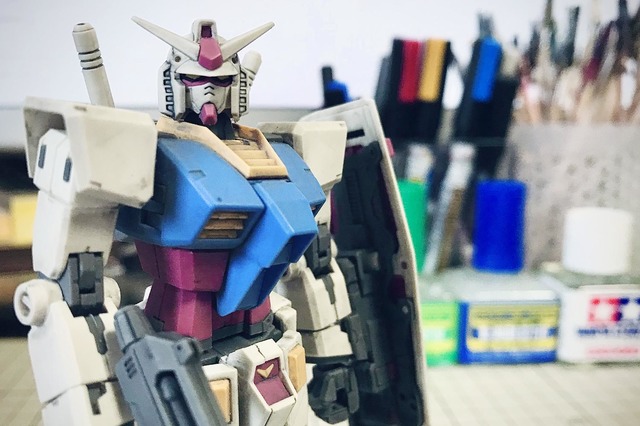
Hmmm, I feel like something is missing. It’s important to take a picture and ask yourself if it actually captures the atmosphere you had imagined.
It is also a good idea to have a friend look at your photos. It may be embarrassing to have someone look at your photos, but getting advice is also a shortcut to growth.
If you turn on the light in the room, the light will be too bright, and you won’t get the atmosphere you are looking for. What I want is the sense of accomplishment that comes from working hard alone at night to make something, and I also want the photo to have a slightly lonely atmosphere.
So I tried turning off the light in the room. As you may have guessed, moonlight alone was not enough for me, so I used one of the LED penlights that can be found anywhere and took pictures by shining it like a spotlight on a stage.
What do you think? The plastic model production items in the background are now black, but don’t you think the atmosphere is slowly starting to form?
First, take a hand-held shot. When you find the right angle, you can fix the camera. This time, instead of using a tripod, I placed a stack of plastic models (models that I bought but haven’t been able to build) on the chair and used a smartphone holder to hold the camera in place.
After fixing the camera and fine-tuning the posing/lighting, it’s time to shoot. Focus on what you want to show, set the self-timer so that the camera doesn’t shake when you press the shutter button, and… shoot! (Lockon Stratos style)
What do you think? It’s starting to look a lot more atmospheric.
This photo was taken with a smartphone, but since it’s a good opportunity, let’s do some “editing”. Nowadays, most smartphones have editing and filter functions, so anyone can do it easily.
“Isn’t editing a bit difficult?” “Won’t it make the picture seem unnatural?” I’m sure there are many opinions.
But when you take a picture, don’t you ever feel that the picture you took is different from what you saw when you just pressed the shutter button? That’s because it doesn’t reflect your feelings and thoughts when you saw it. So let’s try to edit it so that it comes closer to the feelings you had when you saw it and the image you want to present.
Here is a photo I edited using the functions of my phone.
Don’t you think it gives the impression of working in the moonlight? And by adding a bit of moonlight blue, I think you’ve created a bit of a lonely atmosphere.
You can take this kind of photo with just the functions of a smartphone and an LED penlight. You may think, “Because you are a pro, right?” but first of all, try taking and reviewing photos with the five points I mentioned in this article in mind. If you do this, you will be able to improve your photography right away.
I’ll show you that the difference in camera performance is not the decisive difference in photographic ability (Char style).
Are you thinking, “I need a real camera like an SLR to take good pictures? Do you think so?
No, that’s not true. You can take good pictures even with a smartphone camera. All of the examples so far were taken with my smartphone (iPhone 7).
From here on, I will show you that you can take cool photos that are as good as those taken with a single-lens camera, as long as you bring out the best performance of your smartphone camera.
Why can’t I get a clean picture with my phone?
First of all, there is a reason why photos taken with a smartphone do not turn out beautiful. Most of them are when the surroundings are dark and the light is weak. In other words, when there is not enough “light”.
In most cases, the phone will increase the ISO sensitivity (the light sensitivity of the image sensor) on its own and slow down the shutter speed to take the picture, resulting in a lot of noise and blur.
In the case of iPhone, you can use an app such as “Camera+2” to shoot manually, and in the case of Android, manual shooting is available by default.
If the manual setting is not enough, you can use a “tripod” to increase the amount of light.
However, using manual settings alone tends to result in dark or noisy photos due to insufficient light. If you want to take more serious pictures, I recommend you use a tripod.
Especially for non-moving subjects such as Gundam models and figures, no matter how slow you set the shutter speed, the picture will not be blurred. Therefore, it is easy to set the ISO sensitivity low and take beautiful pictures without noise.
Dark shooting environments are not good not only for smartphones but also for full-fledged cameras such as single-lens reflex cameras. The reason for using a tripod is basically the same for both SLRs and smartphones, so let’s use a tripod and manual shooting to bring out the best in our smartphones.
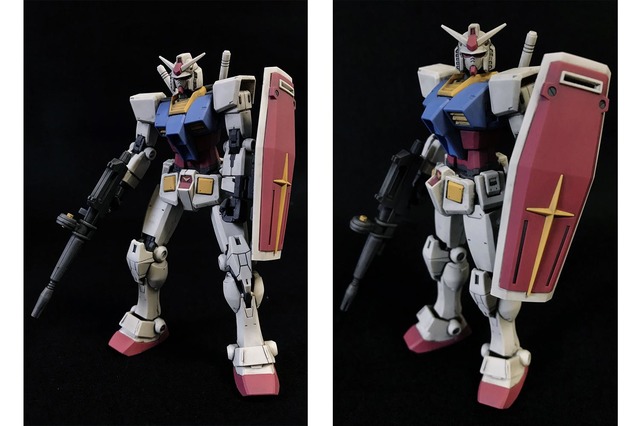
Let’s see what a smartphone camera can do!
Lastly, I’d like to show you a photo that takes the performance of my smartphone (iPhone 7) camera to the limit, and is a bit more serious. The only lights I used were two web meeting cameras and one UV light, which you can easily prepare.
Here are the photos I took.
What do you think? Don’t you think they are quite well done?
The latest smartphone cameras have a telephoto function and a portrait mode that blurs the background. It would be a shame not to use these excellent cameras.
For your reference, here are the items I used this time.
[Equipment used]
Camera: iPhone7
Shooting/Editing App: Camera+
Lights used:
・2x VIJIM R66 lights
・1x umintop IYP365
As for LED lights, I also recommend this one with a mini tripod.
ULANZI VL49
For UV light, I also recommend this one, which cuts out unwanted colors as much as possible.
Lumintop Tool AA UV 365
If you feel that your smartphone is not enough and you want to take real pictures, you can buy a full-fledged camera such as a single-lens reflex camera with interchangeable lenses and enjoy taking pictures.
So, what did you think of the techniques taught by professional photographers?
Please try taking pictures using the techniques I’ve described here, and share your Gunpla, robots, and figures on social media.
May your Gunpla life be glorious!
Related article: find the article “Gundam Morker” by Ohara Sota, the author of this article, here.